Overview
This is an optional step that takes what we’ve built so far and optimizes the app for a production environment. Here's a preview of what you'll build.
Fork, clone and branch
This tutorial has an accompanying GitHub repository called carbon-tutorial-web-components that we’ll use as a starting point for each step. If you haven’t forked and cloned that repository yet, and haven’t added the upstream remote, go ahead and do so by following the step 1 instructions.
Then, start the app:
You should see something similar to where the previous step left off.
Stylelint
While the Carbon component styles are encapsulated in the components there we have written some SCSS ourselves it would great if we could check we are applying Carbon as expected.
For more information on Stylelint visit stylelint.io.
Add Stylelint, a Carbon plugin as development dependencies.
In package.json add the following script:
In the root folder create a file called .stylelintrc.json and add the following settings. The recommended config for the plugin checks layout, motion, theme and type usage against expectations. For more details take a look at the packages README.md
At the command line you can now run the script lint:style. This should highlight just the one issue with the setting of font-weight to 600.
If you open the file you will see that 600 is marked with a wiggly underline.

Hovering over it you will see a popup explanation.
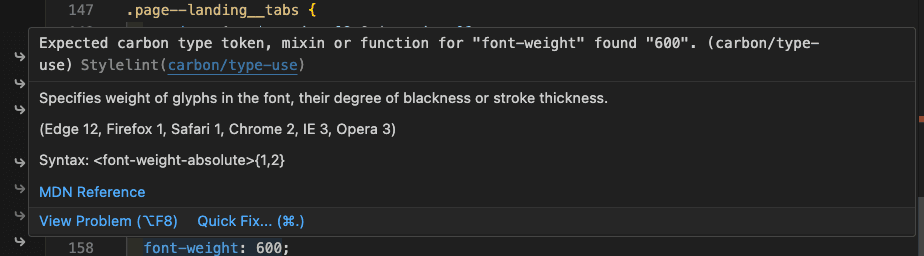
Change 600 to font-weight('semibold')
It is recommended that you use a more extensive rule set for stylelint. This can help keep code consistent and auto fix many potential issues.
If for instance you were to adopt the following configuration it would check for a number of important issues such as accessibility, right to left, and even consistency patterns like nesting depth and CSS class selector pattern.
Even better the small number of issues that it raises, regarding use of logical properties, can be auto fixed bringing your CSS up to date.
Don't forget to add these packages if you want to try out this config.
Running pnpm run lint:style --fix will fix the issues identified.
ESLint & Prettier
In addition to linting styles, it is recommended that you also check your script for dev time errors and consistency.
For more information on ESLint visit eslint.org.
For more information on Prettier visit prettier.io.
NOTE: If you are using a reactive library then there may well be configurations better suited to your purposes.
ESLint checks your code for potential bugs, Prettier ensures your whole teams code uses the same formatting rules. Config for these two is often added at the same time, the package eslint-config-prettier specifically made to help the two work together.
Create a file called .prettierrc in the root of your project and add the following.
Then add a file called eslint.config.js in the root of the project and include the following config.
Add the following dev dependencies
Two more scripts for package.json to run eslint and prettier.
Running these scripts will, not at the time of writing highlight any ESLint issues. If it does in future it may be possible to auto fix them.
It will almost certainly reformat the code compared to your chosen editors preferences.
Spell checkers
If we all had perfect spelling and typing then maybe a spell checker is not needed. However, given that the word typo exists let us assume that somebody on your team is not the perfect vessel to sit between their keyboard and chair.
A spell checker ensures that typo do not, or at least should not go unnoticed.
For more information on cspell visit cspell.org.
Add cspell as a dependency with:
There are many config options, including the ability to create and share custom dictionaries so your brand, pet name or other desirable creations do not get flagged up as spelling errors.
Here we will add the following config file cspell.json.
Add this spelling script to package.json
Running this script will find a number of spellings cspell is not happy with.
In our style file for instance it will highlight our image name illo as not being a word, which is great because it is not.
We can also see in our IDE that this is highlighted with a blue wiggly underline.
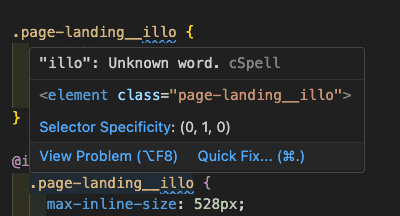
There are a number of ways to fix this. As this is not a spelling mistake we will choose Add: "illo" to config:... from the list of options.
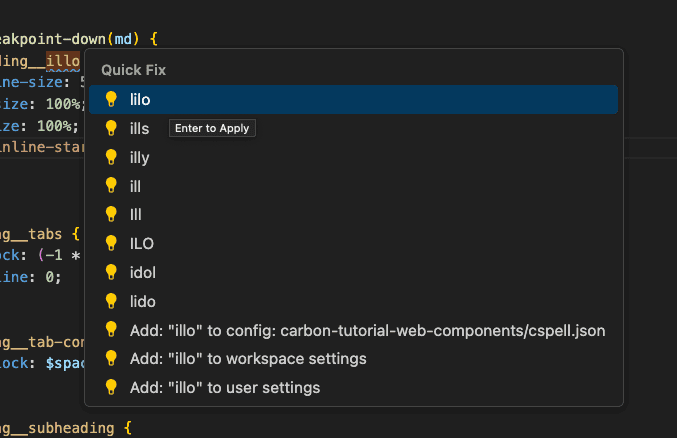
If you view the cspell.json file you will find it has been added.
Deploying to gh-pages
GitHub packages can use a branch called gh-pages to deploy to. In order to do this a couple of important changes are needed first. Without completing these steps correctly you will either end up attempting to deploy somewhere you do not have permission to do so, or deploy a page that cannot find any of its dependencies.
Update and/or add name and homepage to package.json.
Back to package.json we need one last dependency to automate the deployment process.
Next to run the deployment we will add two scripts to package.json
Way back in step 1 you created a fork of the tutorial repo. It is this URL you use for the projects homepage.
Next you will need a vite.config.js file to ensure both index.html and repositories.html are included in the build. The config may also need to set a value for base that depends on various factors.
If a personal GitHub it is likely your vite config will look like this:
If part of an organization use base: '/' instead.
After running the deploy script you will have a publicly visible page. You can locate the page by browsing to the settings page of your GitHub repository. At the time of writing the URL shown in the Pages section where you can choose to unpublish if needed.
For ease of access:
- Select the
Codetab/page - Click on the cog (right side of page) to the right of
Aboutto view the repository details. - Check the
Use your GitHub Pages websiteand save changes. The GitHub pages URL should now appear on the landing page of your repository.
This should include the contents of public, the two html files, CSS and Javascript. If something is missing check your Vite config and package.json against the guidance above and the latest Vite documentation.
#### Deploy
Deploy your application with a base value of /. If the page does not look correct, e.g. not styled or missing icons, then you need to determine what the difference is between the asset location and your base.
Open the developer tools and view the console. Any missing assets should cause messages such as the following to be displayed.

In this case
- GitHub pages location
https://[ACCOUNT].github.io/[REPO-NAME] - Asset location
https://[ACCOUNT].github.io/[ASSET]
The fix would be to change your base setting to /[REPO-NAME]/.
Using the CDN
Lastly we’ve been using main.js to load components from node_modules but Web Components do not require is to do this. All of Carbon Web Components is published via a CDN see the documentation for further details.
Remove the component imports from main.js.
Remove the component imports from landing.js.
Remove the component imports from repos.js.
In the head of index.html add the following script tags.
We also need to update repositories.html with:
If you run the application again you are running with no dependency on node_modules/@carbon/web-components.